
MidiPaddy user manual
Connect, configure and play MidiPaddy on iPad or Mac.
1. What MidiPaddy does
MidiPaddy is a configurable MIDI control surface for iPad and Mac. It sends MIDI to hardware instruments and compatible music apps. It does not contain a synthesizer and produces no sound on its own.
The Mac version is an installed Mac Catalyst desktop application. It is not a web app and is not merely the iPad app running on Apple silicon.
For the first test, keep the receiving instrument at a low volume and keep Panic within reach.
2. Install MidiPaddy
- Open the MidiPaddy App Store listing on your iPad or Mac.
- Download MidiPaddy for the device you want to use.
3. iPad and Mac comparison
| Area | iPad | Mac |
|---|---|---|
| Requirement | iPadOS 18 or later | macOS 15 or later; Apple silicon or Intel |
| Primary interaction | Touch | Mouse or trackpad; typing keyboard in Studio |
| Velocity | Fixed or motion-based Impact velocity | Fixed velocity with configurable Shift velocity |
| Piano expression | Finger-slide Polyphonic Aftertouch | Typing keys do not measure pressure or aftertouch |
| Availability | Available on the App Store | Available on the Mac App Store |
Profiles and assignment behavior are compatible across platforms, but data remains local. There is no automatic cloud synchronization, and this guide does not claim a profile-transfer workflow.
4. Mac quick start
- Open MidiPaddy and select the Studio surface.
- Click the MIDI button, select a destination, enable it under output routes and choose the matching MIDI channel.
- Leave Edit mode, close any open sheet and click the unobscured Studio performance surface to return focus to it.
- Choose Split hands, DAW two-row or B-System (4-row) from the keyboard menu beneath Studio.
- Play Studio chords with the computer keyboard.
- Switch to Performance or Control to play the eight pads with A S D F G H J K.
Resize the window if MidiPaddy asks for more room. Computer-keyboard piano note entry works only in the unobscured Studio performance surface, outside Edit mode and with sheets closed. Performance and Control use their separate pad shortcuts.
The Mac-only computer-key layout selector is in the keyboard menu beneath Studio. It is separate from the Studio/Performance/Control surface selector. Its selection persists locally and is not part of a mapping profile.
5. Connect a MIDI destination
- Tap on iPad or click on Mac the MIDI button in the top bar.
- To pair a Bluetooth MIDI device, open Bluetooth MIDI… and connect it in Apple’s connection panel.
- For wired MIDI, connect a compatible USB MIDI interface and select its destination under output routes.
- Enable the connected destination under output routes. Bluetooth pairing alone does not select it as an output.
- Select the same MIDI channel expected by the receiver.
Virtual MIDI
Enable Virtual Output, then select MidiPaddy as an input in the receiving music app. Seeing the virtual source does not prove that another app is listening to it.
MIDI Learn inputs and MIDI outputs are selected independently. Incoming Learn messages are not echoed automatically.
6. Choose a profile
Open the profile menu in the top bar.
- Generic MIDI is ready with common assignments.
- Blank has no generic assignments; controls remain muted until assigned in Edit mode.
You can duplicate, rename and delete user profiles. Editing a factory template creates a user copy.
7. Choose a surface
- Studio centers on the piano keyboard.
- Performance provides large note pads and expressive controls.
- Control exposes the densest set of assignable controls.
Held notes and momentary controls are released safely before the surface changes.
Mac pad shortcuts
In Performance and Control, the eight pads use A, S,D, F, G, H, J andK. Each pad displays its assigned letter. Hold multiple keys together to play chords.
8. Set the MIDI channel
Choose channel 1 through 16 in the top bar. Assignments set to Profile Default follow this channel; explicit channels do not.
9. Play the Studio piano
The piano initially spans C3 through C5. Use the visible octave controls to move the range on either platform.
On both iPad and Mac, the octave buttons respond across the full area surrounding their arrows, not only the arrow itself.
iPad touch interaction
Tap or slide across piano keys to play. iPad supports fixed velocity and motion-based Impact velocity. Impact uses whole-device motion, so cases, stands and simultaneous taps can affect it.
When supported by the receiver, vertical finger movement sends MIDI Polyphonic Key Pressure independently per key. This is specifically a touch interaction; Mac typing keys do not provide equivalent pressure control.
Mac computer-keyboard layouts
Select a layout from the keyboard menu beneath Studio. These layouts and their typing-key shortcuts are available only on Mac.
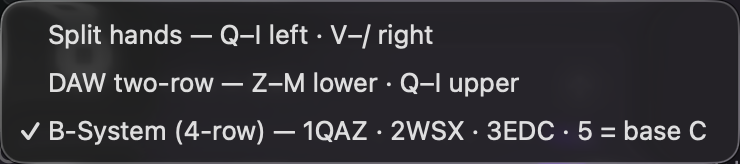
Split hands (default)
Lower and higher playing areas remain split across the keyboard. The upper sharps are correctly aligned: = andDelete sit between the notes played by [,] and \. The - key is unassigned in this layout.
DAW two-row
The familiar two-row piano arrangement now extends both hands across the remaining keys on the right side of the keyboard.
B-System (4-row)
Forty-three consecutive chromatic notes follow the four-row pattern 1QAZ, then2WSX, then3EDC, and onward. At the default octave, 5 plays C3. The final-, [ and ' keys play C5, C♯5 and D5.
Every visible piano key has a binding in this chromatic layout. Only each note’s primary binding appears on the piano to avoid clutter.
Mac shortcuts and velocity
- Hold Shift while starting a note to use the configured Shift/high velocity.
- Press Control to move the keyboard range down one octave.
- Press Option to move it up one octave.
- Press Left Arrow or Right Arrow in Studio to lower or raise the octave by one step.
- Press Down Arrow or Up Arrow in any layout to select the previous or next program.
Control and Option are octave-step actions; releasing the key does not reverse the change. Octave changes release held notes safely. The visible octave buttons remain usable.
Each arrow-key press moves one step. Arrow-key shortcuts pause while editing and whenever a sheet is open.
Mac does not support motion-based Impact velocity. An existing Impact-configured profile uses its soft velocity on Mac, while Shift uses the configured high velocity. Mac fixed-velocity settings expose a configurable Shift velocity.
Ordinary typing keyboards do not measure strike velocity or pressure aftertouch. Chord capacity can depend on the keyboard’s rollover limitations.
10. Use controls
- Drag knobs and faders with touch, mouse or trackpad.
- Use pitch and modulation controls for configured messages.
- Tap on iPad or click on Mac buttons configured as Momentary, Toggle or Trigger.
- Drag the X-Y pad for independent X and Y messages.
- Open the program number to enter 1 through 128 directly.
On both platforms, octave buttons respond across the full area around their arrows. Program controls use down and up arrows, with equally generous clickable areas.
Unassigned controls appear muted and send nothing.
11. Edit assignments
- Enter Edit from the profile menu.
- Tap a control on iPad or click it on Mac.
- Choose message type, label, channel, number, range and interaction settings.
- Use Test carefully; it sends the draft immediately.
- Save, or cancel to discard the draft.
- Select Done to return to performance.
12. MIDI Learn
- Enter Edit and open a control.
- Arm MIDI Learn.
- Move the corresponding external control.
- Review the captured compatible message and save.
Learn times out and can be cancelled. Learn input selection is independent of MIDI output selection, and captured messages are not echoed automatically.
13. Program and bank changes
The program section sends a program change and can optionally send bank select first. Human-facing programs are numbered 1 through 128. On Mac,Down Arrow selects the previous program and Up Arrowselects the next program in any layout; each press moves one step.
14. Panic and interruptions
Use Panic if a receiver retains a note or momentary state. Panic releases tracked notes and also sends MIDI All Notes Off (CC 123, value 0) on all 16 channels to currently selected, available outputs.
A disconnected receiver cannot receive cleanup messages. Reconnect it when possible and use the receiver’s own reset if needed.
15. VoiceOver and assistive access
VoiceOver exposes individual piano keys, full labeled knob and fader regions, buttons, profile actions, routes, channel selection, Panic and octave controls.
16. Troubleshooting
There is no sound
MidiPaddy sends MIDI only. Confirm a receiving instrument or music app is selected, listening on the matching channel and connected to audio.
Bluetooth is paired but receives nothing
Enable the destination under output routes; pairing and output selection are separate.
Studio piano keys do not play
Select Studio, leave Edit mode, close sheets and return focus to the unobscured performance surface.
Performance or Control pad shortcuts do not play
Leave Edit mode, close sheets, return focus to the active surface and use A through K for the eight labeled pads.
Some notes are missing from a chord
Check the computer keyboard’s rollover limits. Try another MidiPaddy keyboard layout or another physical keyboard.
Impact velocity is unavailable on Mac
Impact depends on whole-device motion and is available only on iPad. On Mac, use fixed velocity and the configured Shift velocity.
I cannot find MidiPaddy in the App Store
Open the MidiPaddy App Store listing on your iPad or Mac. Check that your iPad runs iPadOS 18 or later, or that your Mac runs macOS 15 or later.
A control does not transmit
It may be unassigned. Edit it or begin with Generic MIDI.
The receiver has a stuck note
Use Panic. A disconnected receiver cannot receive cleanup messages; reconnect it and use its own reset if necessary.
17. Privacy
MidiPaddy requires no account and transmits no analytics or personal data. Profiles, assignments and preferences remain local. See the MidiPaddy Privacy Policy.